
In this UV resin cat keyring tutorial, I’ll show you step-by-step how to make a simple beginner-friendly keyring using UV resin.
Why am I making these beginner tutorials?
I was inspired to start writing my blogs after seeing so many questions on social media from beginners who were just so unsure ‘where to start’ they were all enthusiastic to craft but were in need of basic beginner guidance. I hope through my tutorials I can give some practical advice, guidance and encouragement to inspire beginners on their craft journeys.
This post contains affiliate links. If you purchase through them, I may earn a small commission at no extra cost to you
In this video you will see me making a Cute Cat Keyring, and here I write it out step by step, now I use some colour in mine BUT you could choose to make this just totally clear by using ‘just’ the UV resin on its own, (it maybe that you have not yet bought any colouring as you are unsure what to buy) So at the most this tutorial is just 10 steps, but can be done in less if you choose not to use any colour pigments. So watch the video first and as you will see I made some mistakes – its not all about being perfect, and most mistakes can be rectified – some mistakes turn out great thats a real bonus.
Safety First
Always work in a well-ventilated area and wear gloves when handling UV resin. If using a UV lamp, avoid direct exposure to your eyes.
- Step 1 Pour UV resin into your mold, just enough to cover the bottom of mold and cure with either a UV torch or UV lamp (you can find lamp & torch here on my tools page)
- Step 2 Add coloured resin, again as before just a thin layer to cover the first layer ( you can leave the colour out and just use clear UV resin) This is the colour I use and then cure again (if you are not using colour just top up your mold with resin and cure, then move onto Step 6.
- Step 3 Add a couple of drops of a darker colour and swirl, twirl it around make a patten of your choice.
- Step 4 Cure under a UV lamp or with a UV torch, I advise you use a lamp, a torch is fine for small or awkward areas.
- Step 5 Apply another layer ( a top coat ) of resin, carefully and cure again
- Step 6 Add your jump ring – now in my video you saw that I had accidently covered the hole with resin, mistakes happen – its not the end of the world, they can usually be fixed. I will be covering when mistakes happen in future tutorial blogs.
- Step 7 Re-drill the hole if needed I use a Dremel Multi Tool I find it very useful for this purpose and also sanding, engraving its a very useful tool to have, I will talk more about this in a future blog.
- Step 8 Add your Jump Ring – I use stainless steel jump rings, for strength
- Step 9 Attach to your Keychain
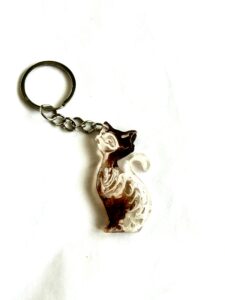
- Step 10 Finally attach your key to the split ring – You did it, you have made a UV cat keyring
You can find all the resin and clay tools and materials I personally use on my Tools & Materials page here.
Beginners Tips
- Try not to overfill your mold
- Cure in thin layers
- Rotate your piece under the lamp for even curing
- Practice with clear resin first
If you try this tutorial, I would love to see your creations – please feel free to leave a comment below or tag me on social media.