
This post contains affiliated links. As an Amazon Associate I earn a small commission from qualifying purchases at no extra cost to you.
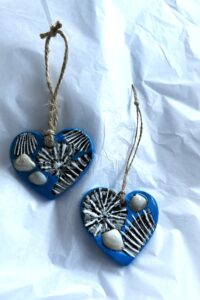
The heart oil diffusers are now ready for sealing and finishing -the final stage, for this process I am using UV resin, which will give them a nice shiny, glazed finish, and as they have been created with air dry clay, it will also protect and strengthen them.
If you missed the previous videos you can see them here part 1 & part 2
In this video part 3, I coat each heart with UV resin, whilst taking care, to leave some areas free from resin, to enable essential oils to soak into the raw clay – to slowly release a natural scent into your home. I the finish the process by tying a length of natural jute twine, for a nice rustic feel to the seaside-inspired beautiful scented oil diffusers.
Please see previous blogs on safety when using resin.
I do hope you found inspiration from this beginner 3 part tutorial – and go on to create your own handmade airdry clay essential oil air diffusers, I would love to see your creations.
On my Tools and materials page I share with you all tools that I personally use, to help you – if your just starting out, it can be a bit daunting, not knowing which products you need, so I hope this makes it easier for you.
You can view my other tutorial blogs here for more creative inspiration and useful tips – when using UV resin and air dry clay.