
And Adding a Little Glitter for some Sparkle:
This post contains affiliate links. As an Amazon associate I earn a small commission from qualifying sales at no extra cost to you.
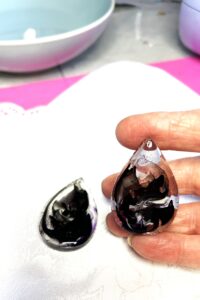
Inks and Dyes are still Wet
This video continues from where my last video that was about using epoxy paste ended, if you missed the first video you can watch it here. I now have removed my mold from under the UV light to discover that the inks and dyes are still wet on the surface of my resin pieces – so what do we do now? First don’t panic its an easy fix, as you will see in this video.
But of course I could not stop at just adding one layer of UV resin, I also show you how to add a little sparkle to your piece with some glitter.
Now at the end of the video, we have another little hic-cup, as I obviously was not being as careful as I thought I was — and some of my resin ran over the edge, which cured and left a rather large lump of resin on the edge of my piece. I am however actually quite pleased about this because as I have said before accidents do happen to us all – this proves it, and I will happily show you in my next video blog how to fix it. For this I will be using my Dremel Multi Tool, so please do join me, let me show you how easy it is to fix with the right tools.
You can see most of the tools and materials I personally use for making my creations, here on my tools page
I look forward to you joining me for my next video when I will be demonstrating my favourite go-to tool my Dremel Multi Tool – and showing you how to overcome another small problem that often occurs when using UV Resin.