
This post does contain affiliate links. As an Amazon Associate I earn a small commission from qualifying purchases at no extra costs to your self.
This video is not really part of my beginner tutorials, I just thought you may like to see the process of creating this Clay Bird Essential Oil Diffuser. For this project I used DAS Air Dry Clay in a terracotta colour. I cut out a rough bird shape from the rolled out clay, and then cut a heart shape to use as a wing, and a small circle for the head. I joined the pieces together with a slip ( mixture of clay and water )left to dry for a few days.
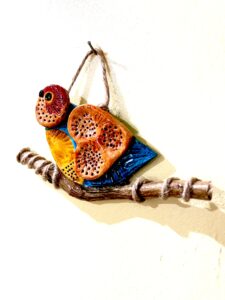
Once dry, I painted all over with white acrylic paint and then put my Dremel Multi Tool to use and drilled some small holes into the bird where the essential oils will be able to seep into the raw clay and slowly release the scent into the air.
The next stage was to paint some nice bright attractive colours – I decided to try painting with Pébéo Vitrail specialised glass paints, never tried this paint on clay before and it worked really well so I am sure I will be doing this again. Watch the video now and see what you think.
As you saw in the video, after painting I added a layer of UV resin, I love combining clay and resin together, they compliment each other so well – The resin gives protection and strength to the fragile air dry clay and the lovely glazed finish.
I have really enjoyed making this bird oil diffuser, I am going to make a few more. I will do some as simple decorative wall hangings and others as oil diffusers all in different styles and colours. These will all be available to purchase from my Etsy shop in due course.
I hope you enjoyed watching this process – and maybe also have ago at making your own, if you are just starting out on your journey with UV resin or air dry clay you may find my beginners tutorials helpful, you can see the first one here.